It'll Grow

A bad haircut. I am sure that many of us have ‘been there, done that’; perhaps more times than we would like to admit! Maybe it was the result of an adventurous whim to ‘try something new’ or one too many bad hair-days that finally led to an emotional snap, regardless of the motivation, at one point most of us have walked into a salon with a clear and simple directive: CHOP IT!

Regret soon follows: “What was I thinking?”

You beat yourself up a little: “I must have been crazy!”

And you try to find a solution: “Maybe I can cover this up somehow…”

Luckily (and thankfully), with time the bad haircut fades away to become a little blip in your hairdo history.

What on EARTH does this have to do with gardening you ask?

Well, one of my latest gardening tasks- completely cutting down perennials to rejuvenate their foliage- may conjure up feelings similar to the aftermath of a bad haircut… but I promise you that it will all work out in the end.

Now it may seem totally crazy to completely ‘whack back’ a perfectly lush plant in the middle of the growing season, leaving a gaping hole in your garden… but that is precisely what we do! The reason? The foliage of certain perennials can deteriorate once their flowering period wraps-up. Cutting these worn-out looking plants down to the ground (being mindful to not chop new growth that is already emerging from the base) is a great way to encourage a new flush of leaves that will look fresh and continue to look great for the remainder of the growing season.

When cutting perennials to the ground, it is important to be mindful of new foliage that is already starting to grow from the base of the plant- such as these tiny Alchemilla mollis leaves.

When cutting perennials to the ground, it is important to be mindful of new foliage that is already starting to grow from the base of the plant- such as these tiny Alchemilla mollis leaves.

Common perennials that respond to this seemingly harsh treatment include:

  • Alchemilla mollis (lady’s mantle)

  • Centaurea montana (bachelor’s button)

  • Geranium cvs. (various ‘sprawly’ cranesbill geranium cultivars such as ‘Johnson’s Blue’)

  • Nepeta spp. (various species of catmint)

  • Papaver orientale (oriental poppy)

  • Pulmonaria (lungwort)

Alchemilla mollis (lady’s mantle) after flowering (left) and cut down to the newest leaves, as shown in the photo on the right (Gasp- what have I done?!?). .

Alchemilla mollis (lady’s mantle) after flowering (left) and cut down to the newest leaves, as shown in the photo on the right (Gasp- what have I done?!?). .

Another example of a patch of Alchemilla mollis after flowering (left) and cut down to the youngest leaves (right).

Another example of a patch of Alchemilla mollis after flowering (left) and cut down to the youngest leaves (right).

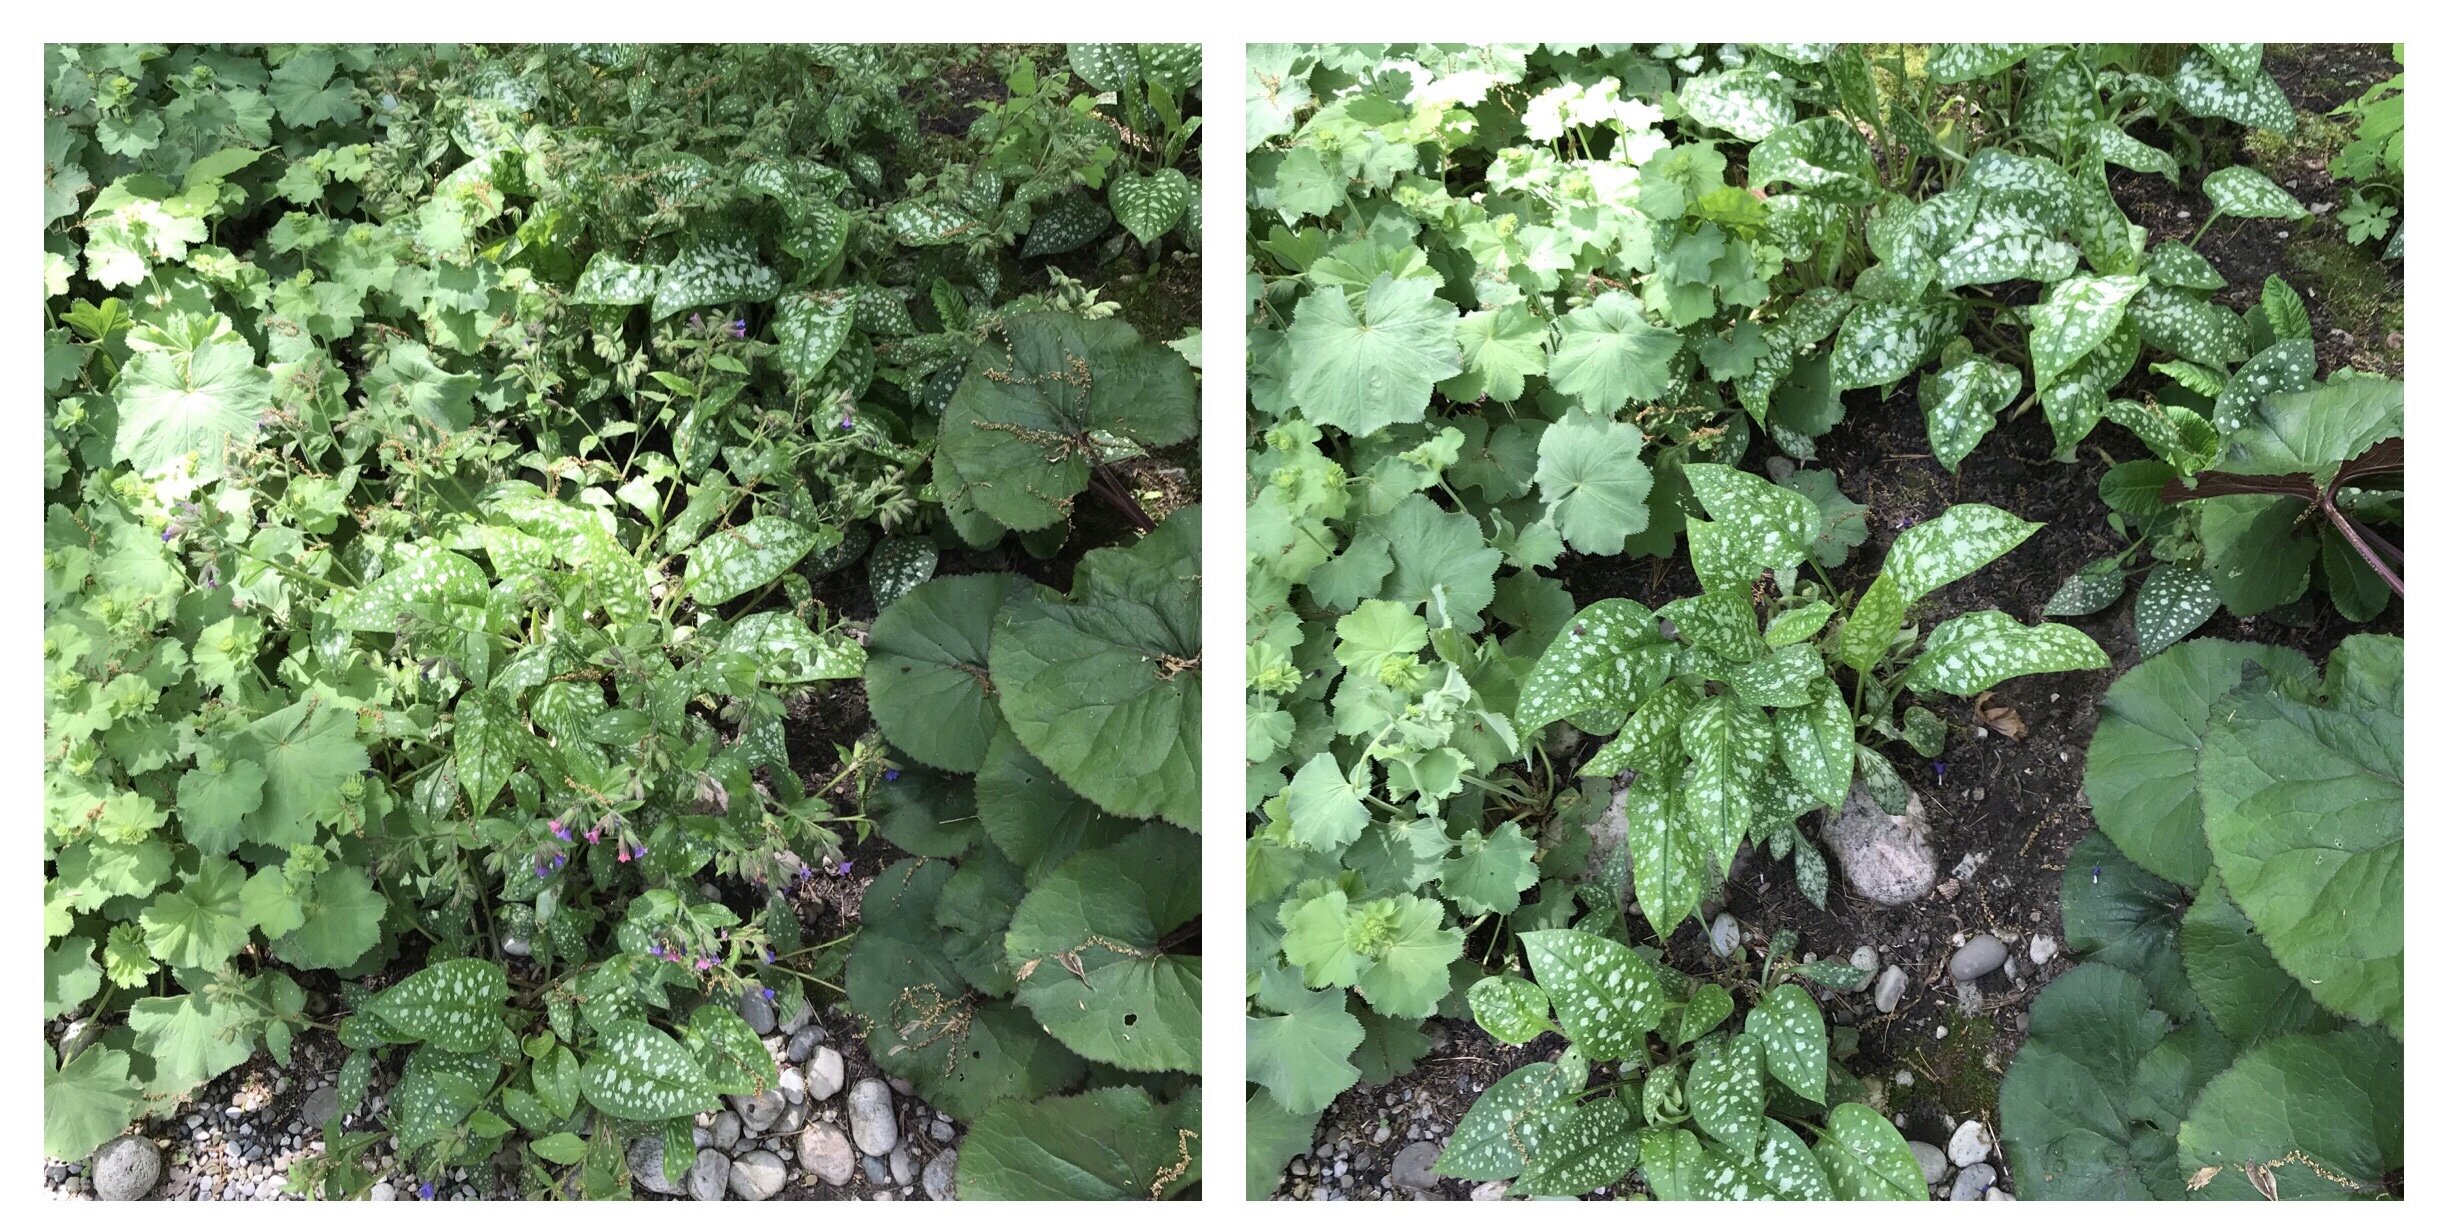
A patch of Pulmonaria showing the plants immediately after flowering (left) and with most of the old leaves cut down (right). As the new growth continues to flush out, I will go back and cut out the remaining old leaves- this two step approach is no…

A patch of Pulmonaria showing the plants immediately after flowering (left) and with most of the old leaves cut down (right). As the new growth continues to flush out, I will go back and cut out the remaining old leaves- this two step approach is not so jarring to look at, and a little kinder to the plant too.

I will also use this technique on other plants under certain circumstances. For example:

  • Aquilegia spp. (various species of columbine)- the leaves of these perennials are often feasted upon by leaf miner (little bugs that live and dine within the leaves). The tracks of feeding damage on the leaves can look quite interesting when feeding is minimal, but the leaves can look quite ratty when the infestation is severe. Chopping the plant down to the ground helps reduce the insect population and the new growth is generally not affected by the pest (or affected to a much lesser degree). .

Leafminer damage on Aquilegia (columbine).

Leafminer damage on Aquilegia (columbine).

  • Hemerocallis spp. (daylily)- daylilies look amazing up until they bloom at which point their foliage begins to die back. The unsightly dead foliage can be remedied by dead-leafing (removing the dead leaves) but some plants will die back so extensively that the resulting ‘stringy look’ is hard to bear. If a daylily gets to this point, the plant has usually started to sprout new growth at the base. I will cut all the old leaves down to allow this new growth to take over.

A daylily in flower that is starting to show leaf die-back (left). At this point, the aesthetics are improved by dead-leafing (right). If die-back becomes extensive, I remove all the leaves to make way for new, fresh growth.

A daylily in flower that is starting to show leaf die-back (left). At this point, the aesthetics are improved by dead-leafing (right). If die-back becomes extensive, I remove all the leaves to make way for new, fresh growth.

A word of caution

It is important to remember that removing leaves from a plant means removing the abilty of the plant to make food for itself. This is tough for the plant! Help the plant rebound quickly by minimizing other stressors. Ensure the chopped plants stay well watered; drought-stressed plants will not be able to respond with new growth. Additionally, you may choose to add some nutrients to the soil in the way of compost or manure to ensure the plant has what it needs to grow.

And there you have it! Now it is time to grab your secateurs and chop down some foliage (if you have any of the plants listed above). Afterwards, step back and stare at the hole you just made in your garden with some regret, but keep in mind that little tidbit of consolation that was offered to you repeatedly during the days following your bad haircut…

“It’ll grow back”.

The Natural Prune

Pruning season is in full effect now. It’s a fun time of year because as early-blooming shrubs come out of bloom, it is generally the perfect time to prune them before they begin setting flower buds for next year.

Pruning can be a daunting task for many gardeners who are often incapacitated by the thought of timing things properly and the fear of killing their plants. Rest assured, if you time your pruning immediately after the flowering period, and remove no more than one third of the plant, your plant should be fine and flower again next season. (I said *should* because there are always exceptions, and if the plant is stressed in other ways such as through drought or nutrient deficiencies, the ability of the plant to rebound from pruning can be compromised. Additionally, some plants are more tolerant of a ‘haircut’ than others.)

I think that in reality, the main concern when it come to pruning should be disfiguring a plant- which happens all too often. Plants, like people, come in all shapes and sizes; and, also like people, the natural growth habit of a plant is what contributes to it’s natural beauty. This is why it drives me CRAZY when I see hedge shears used as a general all-purpose pruning tool (especially by landscape crews).

Don’t get me wrong- I love my hedge shears BUT they serve a specific purpose and that is for pruning hedges.

Don’t get me wrong- I love my hedge shears BUT they serve a specific purpose and that is for pruning hedges.

Hedge shears should only be used for one thing and that thing is….

anyone…

anyone…

Bueller?

The answer is HEDGES!!!!

Hedge shears are great for pruning things into lines, tight globes, pyramids, random animal shapes… but when it comes to flowering shrubs, they absolutely decimate the natural growth habit of a plant. (If you are a person who likes all the plants in your garden to be rounded- you are not alone, many people do, however this is not the post for you! You may now save yourself a few minutes of time and gracefully bow out of this article.)

Hedge shears: great for things like boxwood spheres… but not for the other flowering shrubs in the garden (such as the Hydrangea paniculata or Cornus kousa growing in the background).

Hedge shears: great for things like boxwood spheres… but not for the other flowering shrubs in the garden (such as the Hydrangea paniculata or Cornus kousa growing in the background).

OK- back to natural shapes…

Let’s use a kousa dogwood (Cornus kousa) as an example. This is a shrub known for it’s architecturally stunning horizontal branching structure. Here are two photos- the first on the left showing the natural form of the tree, and the second (on the right) that has fallen victim to the hedge shears.

IMG_2402.jpeg

Poor dogwood! This type of disfigurement is completely avoidable with a little knowledge of how trees and shrubs grow and respond to pruning.

The Effect of Pruning

Let’s backtrack just for a second and take a look at what pruning actually does to a plant. When a pruning cut is made, it encourages the plant to grow from the next available growing point behind the pruning cut which is either:

  1. A bud or set of buds

  2. Existing branches

If a branch has been pruned back to a bud/buds, this is known as a ‘heading-back’ cut. The bud(s) are essentially forced to grow (in the direction in which they are pointing) and the pruning has ultimately promoted branching at the point of pruning.

Pruning back to a bud (a ‘heading back’ cut). The yellow dot indicates the pruning point and the red arrows illustrate the direction of resultant growth.

Pruning back to a bud (a ‘heading back’ cut). The yellow dot indicates the pruning point and the red arrows illustrate the direction of resultant growth.

When a plant is routinely sheared (or just the tips of branches are snipped off to control size), the constant growth from buds and resultant new branches ultimately leads to a tree or shrub with really dense growth and branching on the outer edges and bare stems within the centre of the plant- not exactly a natural form!

A basic schematic that shows how routine shearing leads to a shrub with very dense branching on the outer edges of the shrub and a sparse interior.

A basic schematic that shows how routine shearing leads to a shrub with very dense branching on the outer edges of the shrub and a sparse interior.

On the contrary, when a branch is pruned back to another branch (known as a ‘thinning cut’), the plant will essentially direct it’s growth toward that remaining branch.

A ‘thinning cut’ back to a lateral branch (indicated by the yellow dot) and the resultant growth directed toward the remaining branch (as indicated by the red arrow).

A ‘thinning cut’ back to a lateral branch (indicated by the yellow dot) and the resultant growth directed toward the remaining branch (as indicated by the red arrow).

It is these thinning cuts that are the key to what I like to call ‘the natural prune’. Here is how it is done…

The trick is to visualize a ‘shrub within the shrub’. Usually I get blank looks when I use this line- but it is the best way to describe the process. Essentially, you want the shrub to have the exact same branching structure after the pruning job is complete as it did before you took the secateurs to it, yet the overall size is scaled back.

Perhaps the idea of pruning sounds even more daunting than before? Have no fear! Let’s walk through this together.

I generally follow three steps when doing a ‘natural prune’ on trees and shrubs:

  1. Identify a long branch

  2. Trace this branch back to where it connects with a secondary (lateral) branch somewhere within the shrub

  3. Prune the long branch close to it’s union with the lateral branch (usually a few millimeters away from the point of connection, with the pruning cut angled up toward the lateral branch)

  4. Continue this technique around the whole shrub, multiple rounds if necessary, to remove all the longest branches

An overly simplified image of a shrub illustrating the use of ‘thinning cuts’ to reduce the overall size. The coral-coloured branches indicate the portions of the shrub to be removed, the rest of the shrub remains. Note that the overall height and s…

An overly simplified image of a shrub illustrating the use of ‘thinning cuts’ to reduce the overall size. The coral-coloured branches indicate the portions of the shrub to be removed, the rest of the shrub remains. Note that the overall height and size of the shrub has been reduced using this technique.

Using this technique:

  • with the longest branches removed, the shorter ones become the outermost branches and therefore the overall size of the plant has been reduced

  • the pruning cuts are hidden within the shrub so you won’t be looking at little stubs that scream “I’ve just been pruned!”

  • the form of the shorter branches remain untouched and therefore the natural form of the shrub remains in tact

  • The plant won’t be forced to branch out from buds along the pruned stem because, by pruning to a secondary branch, the tree/shrub has essentially been told to direct it’s energy toward growing that secondary branch

Simple!

A sprawling ‘Glow Girl’ birch leaf spirea (Spirea betulifolia ‘Tor Gold’) immediately after flowering (left) and after a natural prune (right).

A sprawling ‘Glow Girl’ birch leaf spirea (Spirea betulifolia ‘Tor Gold’) immediately after flowering (left) and after a natural prune (right).

A dwarf Korean lilac (Syringa meyerii pallibin) kept as a globe. In this case hedge shears could have been used, but I reduced the size by thinning the longest branches.

A dwarf Korean lilac (Syringa meyerii pallibin) kept as a globe. In this case hedge shears could have been used, but I reduced the size by thinning the longest branches.

Some Final Thoughts

This type of pruning is subtle- something that can be done yearly or every other year to help limit the size increase of the shrub over time. Doing subtle routine pruning is a much better approach to size control than trying to reign in a plant that is on the verge of outgrowing it’s garden space (which is usually the time when people begin to think about taking action). Drastic pruning on an overgrown plant is not only hard on the plant, it rarely looks natural and is usually a loosing battle. With all that said, overgrown plants are best avoided by ensuring your garden can accommodate the mature size of any tree and shrub that is planted in it.

So have fun and take your time with this pruning technique. It will take much longer than a ‘hedge shear haircut’, but the extra time will pay off when you are sitting in your garden admiring the diversity in forms throughout your yard.